750ss Cafe Racer. First time project

Just a thought

Going for the wider front tyre might look the part

Seen quite a lot of bobbers with wide front tyre and wonder whether it would work on the cafe racer.............hmmmm

The problem is not having access to wheels to see what the score is
 
Update November 2012

Having decided to look at other colour options for the forks, I needed a way of seeing the end product without actually painting them

So I bought some shrink wrap, usually used for electrical wiring, and tried white and black

(Shame I can't use photoshop!!)

imag0431ah.jpg


imag0432w.jpg


imag0433l.jpg


imag0434j.jpg


imag0434w.jpg


imag0436h.jpg


imag0438y.jpg


imag0442f.jpg


imag0441n.jpg


Right then, where's the red shrink wrap!!

Now for the calipers and discs
 
Last edited:
Clever idea with the shrink wrap :thumbs:

Black is definitely better than white and white actually looks better than I expected.
 
Update November 2012 Electrics

As I am putting the electrical items under the seat hump, it will need to be housed in a box.........so I made one

A cardboard mock up was made and covered with foil tape (to allow the mold to release)

pa073057.jpg


pa073059.jpg


pa273099.jpg


pb013108.jpg


pa273096.jpg
 
Update November 2012. Frame

Decided to cut away some of the rear frame to give a less cluttered look


pa273103.jpg


pa273104.jpg


I will be welding a new part on to finish the "V" at the end of the lower part

May even go further and weld a new arm from the rear of the foot hanger up to the top rail and remove the back part.............ooeeeeeeeeer!
 
Update November 2012. Mudguard

Having tried to buy a simple mudguard to fit the bike, and failed, I have resorted to cutting down the broken one from my Firestorm

p9163034.jpg


pa073060.jpg


The silver foil was on it as I had intended making a mold, but I have repaired it with fibreglass and filler

Once the bracked is made and it fits ok I will get another undamaged mudguard and cut it down
 
I need to educate you on the finer points of mould production and GRP work in general. :)

Think before you do the other frame mods, the old adage of measure twice cut once springs to mind. Do mock ups with dowel rod before you decide.

Looking good tho, must start mine soon............... :)
too busy burying people at the minute to concentrate :(
 
Last edited:
Update December 12

Just been doing some mock ups for the exhaust, and which lines look good

I think I will stay away from the usual reverse cone/Dunstall look

Have found a 9" or 16" stubby exhaust can, supplied un-chromed

Thinking about this sort of thing, without the long outlet

221110468776404011.jpg


pc073174.jpg


pc073169.jpg


pc073166.jpg


pc073162.jpg


I just hope the foam will be able to take the heat:rolleyes::rolleyes::rolleyes:
 
Dec 2012 Update

The exhausts have arrived!!

pc203190.jpg


pc203188.jpg


Dont think they will be as high as on the mock up

Will be taking the bike to have some link pipes made (in January)
 
Been tyring to get the exhausts into the right position to allow me to get the link pipe made

This is my first attempt, using a bar fixed under the seat. Something not right about this set up: The pipe is a bit too vertical

pc203188.jpg


Thought about putting the frame link back in...........hmmm, not bad

p1253197.jpg


This is more like it..........Temporarily fitted the link to finish the frame "V" where I cut it

p1253202.jpg


Just a variation using red

p1253204.jpg


I like it better in black though that may change when the final bracket is designed and made

p1263211.jpg


p1253206.jpg


Now I need to design the bracket and make one...........all I need is a cnc machine for my workshop :eek2

Also, thinking about cutting the end of the frame off, (in front of where the oringinal frame part connected)

(Trying to clean that area up will be a pain in the arse and probably never look correct)

Then have a bent tube welded on the inside of the frame to mirror the curve of the seat (most weld it to the original frame)

This means I can still fit the indicators in the ends of the frame

You will also notice the front mudguard laying on the rear tyre

Looking at this sort of thing for a rear mudguard, a bit wider though

Hope you like it :)
 
Been tyring to get the exhausts into the right position to allow me to get the link pipe made

This is my first attempt, using a bar fixed under the seat. Something not right about this set up: The pipe is a bit too vertical

[qimg]http://imageshack.us/a/img849/8895/pc203188.jpg[/qimg]

Thought about putting the frame link back in...........hmmm, not bad

[qimg]http://imageshack.us/a/img856/1440/p1253197.jpg[/qimg]

This is more like it..........Temporarily fitted the link to finish the frame "V" where I cut it

[qimg]http://imageshack.us/a/img705/5990/p1253202.jpg[/qimg]

Just a variation using red

[qimg]http://imageshack.us/a/img689/9410/p1253204.jpg[/qimg]

I like it better in black though that may change when the final bracket is designed and made

[qimg]http://imageshack.us/a/img5/7314/p1263211.jpg[/qimg]

[qimg]http://imageshack.us/a/img585/5823/p1253206.jpg[/qimg]

Now I need to design the bracket and make one...........all I need is a cnc machine for my workshop :eek2

Also, thinking about cutting the end of the frame off, (in front of where the oringinal frame part connected)

(Trying to clean that area up will be a pain in the arse and probably never look correct)

Then have a bent tube welded on the inside of the frame to mirror the curve of the seat (most weld it to the original frame)

This means I can still fit the indicators in the ends of the frame

You will also notice the front mudguard laying on the rear tyre

Looking at this sort of thing for a rear mudguard, a bit wider though

Hope you like it :)

Looking great. Prefer the black bracket myself.
 
I prefer the black but more importantly having the silencers parallel with an adjacent frame part makes it look more "right". The last pic with the black bracket is almost there
 
Update January 2013. Various

Stripped down the front calipers

p1263212.jpg


Spraying the footrest hangers in the paint booth

p1263213.jpg


Cut the frame at the end

Shaped some frame parts to make the "V"

p1283217.jpg


You may remember I bought some indicators to fit in the end of the frame: Voila!

p1283219.jpg


Will check what it looks like with the frame joined to the end rather than as a "V"
 
ducatidoodle_zpsd6ad07bf.jpg
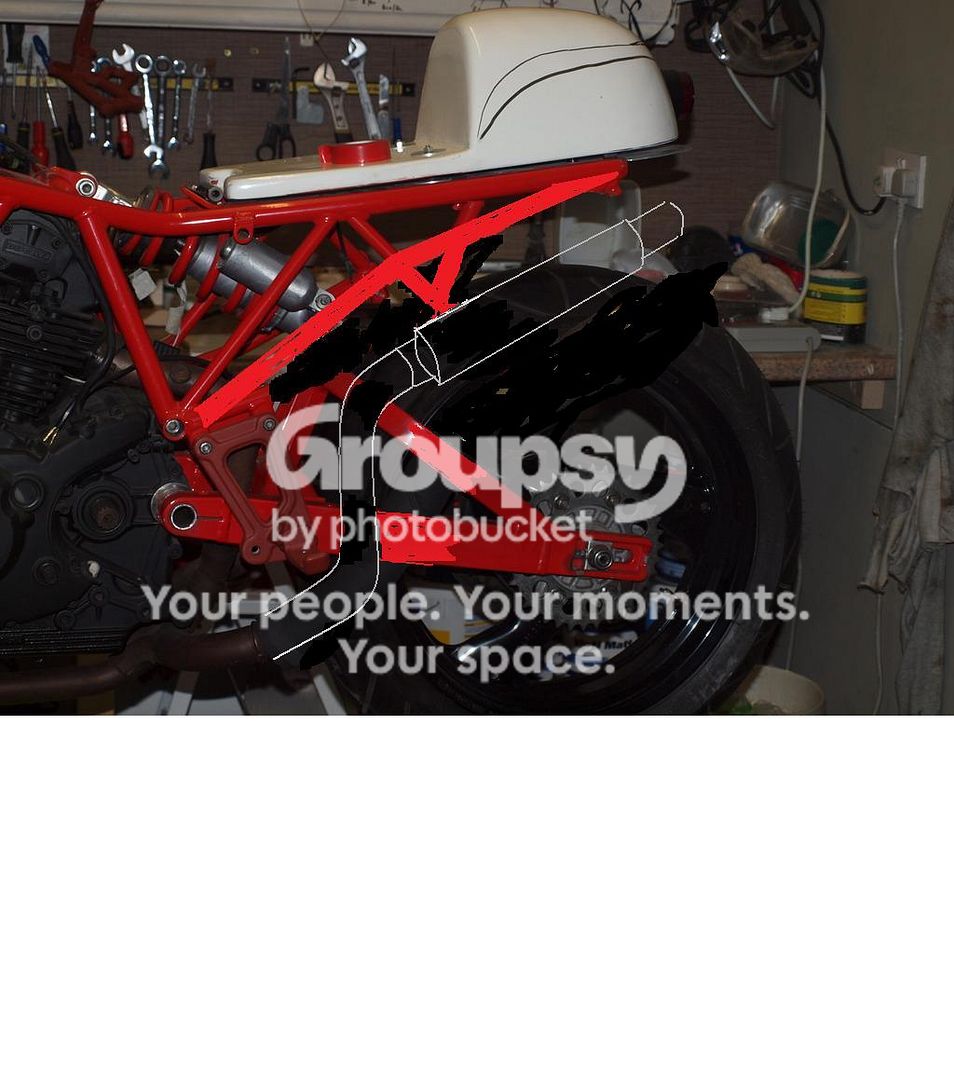
[/IMG]I might be tempted (if I had the skill) to draw a straight line in tube from the bottom mount to a point just before the end of the tube, shortening all the triangulation to suit. Just tried that in paint and it looked crap! Much better is a kinked bottom rail rising at a steeper angle to the triangulation point and then more flatly (not river dance flatley) onward to the rear. Sorry, I haven't described that so well!
 
Last edited:
It's an interesting build, that's for sure.

A few comments,
Some stainless bolts in your calipers would look nice and be low maintenance, although I gather steel or titanium bolts are recommended for the mounting bolts.
I'm a little worried about the visibility of your rear indicators, tucked under the seat some 20" above road height. A signal might be missed by drivers, unless they are nice bright LED's?
Number plate mount is still to come I guess but a plate light will be needed unless you are only going for a daytime MOT?
Likewise a diddly reflector will be needed somewhere, sadly. I remember putting my 916 style tail unit on for a while, which I didn't realise is without any reflector. The good guys in the bike shop (sadly, now long gone), stuck a tricolour reflector on the number plate an then passed the MOT. Not sure it would happen in too many garages these days.

Good luck & keep the piccies coming please!

 
Hello Mr. Flatline.
I too have a 750 ss although mine is staying more or less standard, just needs a bit of tlc. I was reading the thread and noticed that you had polished the bottoms of the forks, you know the bit that the calipers bolt to! I just wondered how you had done this....wet nDry, brillo pad???? fancy doing likewise to mine. Also I did wonder what you had done with the origional cans as mine are a bit rusty.........open to offers??
Thanks.
Chris.
 
noticed that you had polished the bottoms of the forks, you know the bit that the calipers bolt to! I just wondered how you had done this

Some Autosol and a cloth or two and it will bring them up very quickly.
Surprising the difference after one application.
I use an old toothbrush to work the Autosol into the metal and then wipe it off and then simply load a cloth with Autosol (don't keep using a "clean" bit of cloth on application as it works better when the cloth is black and full of the cream) and go over it again.
Using a clean cloth for a final wipe/polish makes a difference to result.
Wear latex gloves though as your hands will be black for days otherwise.
 
Some Autosol and a cloth or two and it will bring them up very quickly.
Surprising the difference after one application.
I use an old toothbrush to work the Autosol into the metal and then wipe it off and then simply load a cloth with Autosol (don't keep using a "clean" bit of cloth on application as it works better when the cloth is black and full of the cream) and go over it again.
Using a clean cloth for a final wipe/polish makes a difference to result.
Wear latex gloves though as your hands will be black for days otherwise.

Sounds good to me. I didnt know if the fork bottoms had that strange silver paint on that other bits seem to have. It appears to be welded on except of course for the bits you want it to stay on.
I'll go and have a look, if they are just plain alloy then it wont be much of a problem.
Ta!
 
[qimg]http://img831.imageshack.us/img831/1244/p1283219.jpg[/qimg]

Will check what it looks like with the frame joined to the end rather than as a "V"[/b][/QUOTE]

Confused - there is a pic further up with these bits already in red in place isn't there?

Martin, that's a better line you've penned in, I was looking at similar on mine.
 
Last edited:
Martin, that's a better line you've penned in, I was looking at similar on mine.

Personally I would just run a straight bit of tube instead of the "penned" tube with a "kink" in it.
Think it would look cleaner and easier to follow the line of the exhaust. Just extend the cross tubes accordingly and maybe extend hanger bolt if need be but possibly fine where it is.
Change of seat unit may dictate where the footpegs need to be anyway.
 
Thanks to all for comments, they are appreciated

Iconic944: indicators are just a mock up, rear light has clear lens at bottom, will be changing as many as bolts possible to black

Martin: Thanks for that, I just wonder if the exhaust hanger would be a bit long?

239desmo, I will certainly be looking at the option I mentioned, as did you, of extending a straight bar to the end instead of creating the "V".

This will keep the hangers as short as possible

Rockjock: The "V" is taped in place, is that what you mean?

Schrimy: Pm sent re zorsts. I used a bench grinder wire wheel and one on a drill

Next is to get the link pipes done, once the zorsts are in the correct position

Found someone in Leeds that can bend the pipes
 
No Phil, in post 44 above the first three photos all have different pieces of tube around that point, somewhat confusing............
 
Not wanting to teach my grannie how to sook eggs but I assume you have tried sitting on the seat to check the ergonomics of reach to bars and where your feet end up?

If your seat is a couple of cm lower than before it could make a huge difference to whether you can actually ride the bike with the pegs in the unaltered position.

I spent probably a couple of hours working out what I could live with and where the pegs needed to be.
 
I drew it with a straight line but the structure looked too 'big' If you used the kinked line you could move the pipes up higher (and so closer) and have shorter mounts (Maybe in a 'v' rather than a strap, to give a firmer mount - you could follow the line of the triangulating pieces right 'through' the bottom rail) Hey, it's your bike, do what looks good to you
ducatidoodle2_zps07db8cb7.jpg
 
Last edited:
Update March 2013

Done a bit more to the DuCafe

Welded on the short support tube under the seat

Finally decided on the position of the exhaust

Wanted it to be a bit higher but the link pipe would interfere with the boot

Will need to re-design the brackets holding the exhaust but its good enough for the fabricator to make/bend a link pipe

p3223271.jpg


Will get it away to the fabricators soon

Next up is the wiring, just ordered shrink wrap so ready to start cutting and connecting
 
Zorsts fitted at last

Finally got the bike to the zorst man

These look rather good, even if I do say so myself

Really pleased with the outcome


p4040006.jpg


p4040002v.jpg


p4040005k.jpg
 
Back
Top Bottom