Another Kawasaki Project !

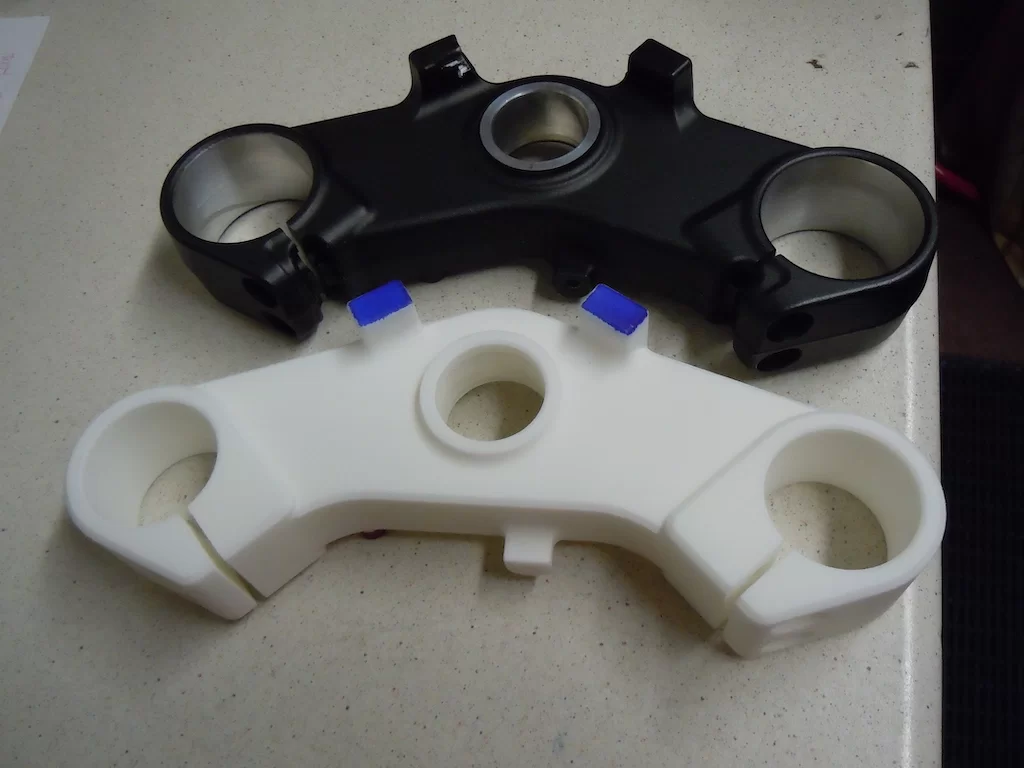
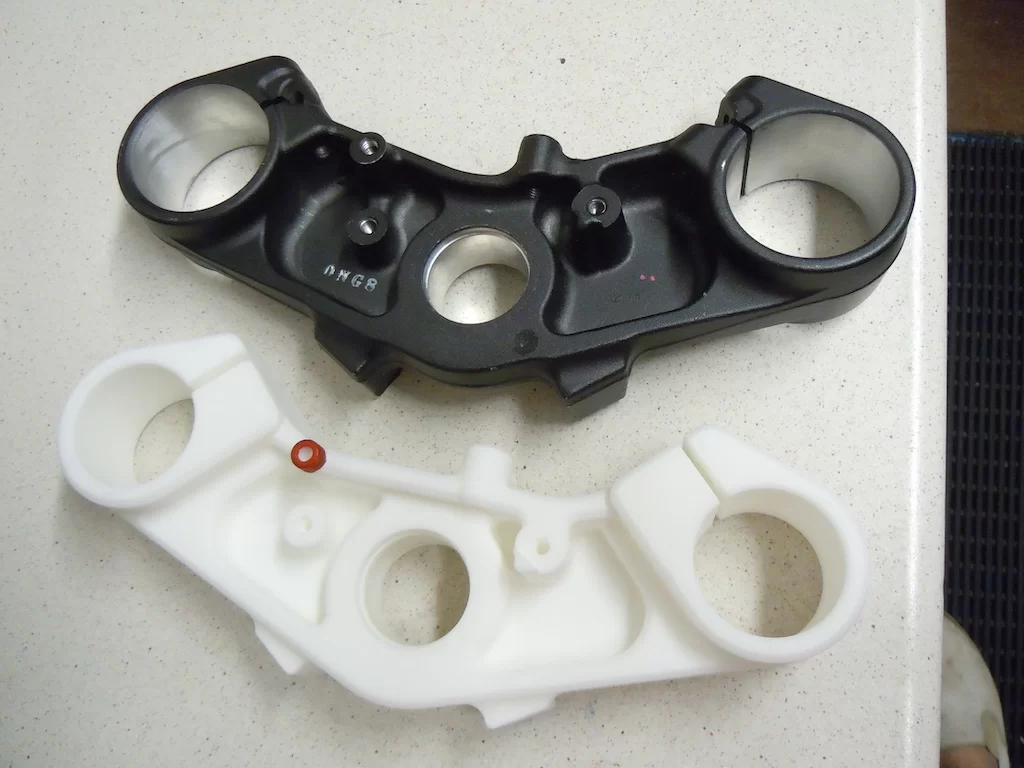
Got the first 3D print today of the lower yoke, to suit the new RWU Ohlins. Sadly it was wrong :cry:
When I was looking on the internet for the original Kawasaki dimensions for the fork off-set I ended up with three sets of dimensions, all proportions to be correct !
Somehow I managed to supply my mate with the wrong dimension for the fork/steering off-set. It should have been 34mm & not the 30mm I told him.
Other than that the 3D print looks good !:ROFLMAO:
B3A6A741-A9B1-4A64-88EF-B77F53B09E97.webp

70128BE1-AFDD-4F5F-A413-EEF98309976A.webp


Anyway, I'll get the drawings altered to suit & get the 3D prints redone, at least I'd only had one yoke printed & more importantly it wasn't at the machining stage !!;)
 
Radiator bling was delivered today, so fitted these two covers. Took all of five minutes to do ! ;)
48841283-3129-4D0C-96AB-1CC908E27098_1_105_c.webp

2DDE08FE-681E-468D-BB1D-6CFC1401155F_1_105_c.webp

Hopefully I'll see my mate this week, who's altering the yoke drawings he did for me. I can then get them 3D printed again & hopefully check they line up with all the standard headlight, indicators, handle bars, ignition switch, etc before having them machined from ally.
 
Fitted my carbon instrument pod cover tonight. Instead of using the double-sided tape that came with the cover & made two small plastic washers & replaced the two Torx screws with two slightly longer countersunk items. A lot easier to remove than trying to break the bond of double sided tape, especially as it would be inside & not easily accessible.

0712077F-2BB6-475D-9162-84141E632639.webp

E038F731-2EB3-44CC-AFE5-5411D978582B.webp

D12C4C6A-691A-4BF8-93D0-1E686094B814_1_201_a.webp
 
Fitted my carbon instrument pod cover tonight. Instead of using the double-sided tape that came with the cover & made two small plastic washers & replaced the two Torx screws with two slightly longer countersunk items. A lot easier to remove than trying to break the bond of double sided tape, especially as it would be inside & not easily accessible.

View attachment 81254
View attachment 81255
View attachment 81256
Do those carbon covers add weight 😉
 
My bigger front discs finally arrived this morning so got them fitted to the wheel ready for drawing up the caliper mounting brackets. Can't really do that now until I've got the new yokes machined up & fitted to the bike, a new wheel spindle made & fitted just to be sure everything lines up correctly.

8781B325-642C-4590-B4CC-FD216A5F7C92_1_105_c.webp
 
The 3D prints of the two yokes arrived this afternoon. The forks, steering stem & headlight frame all seem to line up perfectly. The only possible slight misalignment might be the ignition switch, but I'll wait until I've got it all mounted on the bike before making any alterations. The angle the ignition switch sits at will affect how the steering lock aligns & how the body of the switch sits in the top yoke housing. It will need fitting to the bike to be sure what, if anything is out. It's very hard to measure the mounting angles of the two mounting points, but it will not be much out if it is out, I would guess only a degree at most.
2D037F75-2557-4923-810C-4DCC402EB71F.webp

909F034D-8BA7-4E1B-A7F3-E2013273ACFE.webp

4D30CF45-C331-408F-8FCC-D728EF6E0AF9_1_201_a.webp
 
Those 3D printed yokes are a clever idea.
They're the future ! :ROFLMAO: To be honest they're almost certainly in widespread use these days in many industries.

For me they are a good, cheap way to ensure what you have drawn, or had drawn, fits/works before going to the expense of having the actual part machined.

Mocked up the front on the garage floor this morning while I checked the wheel will fit & there's clearance & to draw up the wheel spindle I want to get made. Once I've got that I'll just need to machine up two spacers to centralise the wheel. The right-hand spacer will be more like a shim washer & the left-hand one will need to be around 12mm thick.
28D93B62-7282-41C8-8F81-523B1CCAE631.webp
 
My rear disc arrived earlier, it took Parcelforce longer to send me the letter for the import duty than it did for the disc to travel from Japan to the UK ! :confused:
1A890B1A-571E-437B-AD29-9128D03541AC.webp

Just need some tyres now, I could use the originals as they've only done 5000 miles, but I want to fit some Metzeler RaceTec's 'cos I like them !!
 
My rear disc arrived earlier, it took Parcelforce longer to send me the letter for the import duty than it did for the disc to travel from Japan to the UK ! :confused:
View attachment 84801
Just need some tyres now, I could use the originals as they've only done 5000 miles, but I want to fit some Metzeler RaceTec's 'cos I like them !!
What tires are still good after 5k?
 
Back wheel is fitted now along with the new rear caliper. Just got to get a new hose made up now as the original item is too short now that the caliper has been repositioned below the swingarm. I had to make a few 1.4mm & 1.2mm shim washers to position the disc centrally in the caliper & to get the correct air gap between the ABS sensor ring & the sensor itself. Made them out of 316 stainless so should see any rust there !
The OEM rear wheel, tyre, disc & sprocket weighed 15.7kgs. according to our bathroom scales & this OZ jobbie comes in at 12.6kgs.

DF8C995C-89A0-4329-85E8-9948BDF87009.webp


Tomorrow's job will be to get the fuel tank off to get access to the ABS pump pipework, ready for the new hose arriving.
 
Well, the pre-swaged hose arrived this morning & I figured it'd be a quick job to get the route sorted, cut to length & ready for sending back for swaging.
How wrong can you be !!
All of the above was achieved, but removing the OEM pipe from the rear caliper to the ABS pump was a nightmare !. Clearly these bike are assembled starting from that pipe & the bike is assembled around it ! There's a metal block on the right hand side of the swingarm where the above pipe joins. Kawasaki have cunningly positioned the detachable side in such a position that it is neigh on impossible to get a spanner on, to split the two halves so I had to resort to old school butchery & bend the metal pipe as I withdrew it around the frame & past the shock absorber mount.
This picture below doesn't really do justice to how hard that is to get to. The block in question sits on top of the block you can see in the centre of the picture & has a bracket on the top with cable clamps attached.

DSCN5459.JPG


On the plus side though, while the tank was off I had a look at the pipe routing for the front brakes. There's a similar joint, but bizarrely they've positioned it somewhere really easy to get at !! Yang & yang I guess !! :ROFLMAO:

DSCN5454.JPG


If anybody is thinking of fitting an under-slung caliper to the rear of their Z900RS, don't, stick with the top mount OEM option, it's not worth the hassle in my opinion !! :ROFLMAO:
 
Last edited:
I'm in awe of the technical ability of you guys doing rebuilds. I have to check manuals to change oil and tension chains.

I find them really interesting to see the detail, and the tiny tolerances you need to work to. And the quality of work.

Goes to all the builds - Cat 3, Exi, Everclear, and The Skitz - you could've shown us the process man :ROFLMAO: I know you're a private guy so no probs.

Thanks.
 
The swaged hose arrived the other day so I've now fitted that, bled the brakes & got the new rear wheel fitted.
In order to keep a bracket, which had two cable guides attached, I replaced the original hose joint block with a P-clip & plastic spacer. Not the easiest place to get your fingers in to hold everything in place while you get the bolt to line up with everything !! Anyway, it's all on now ;)
The silver coloured block you can see in the centre of the picture had one for the rear brake mounted on top of it with a bracket clamping on top of that. You can just make out the plastic spacer & P-clip holding the new hose.

DSCN5468.webp


The new HEL under-slung caliper is also fitted, bled up & I've no fault codes so assuming the ABS sensors are OK !


DSCN5470.webp


And that's the back end done. Just got to sort the front end out now. I just taken the new front wheel & forks to an engineering company I use to get a new axle made out of titanium ! :love:

DSCN5469.webp
 
The swaged hose arrived the other day so I've now fitted that, bled the brakes & got the new rear wheel fitted.
In order to keep a bracket, which had two cable guides attached, I replaced the original hose joint block with a P-clip & plastic spacer. Not the easiest place to get your fingers in to hold everything in place while you get the bolt to line up with everything !! Anyway, it's all on now ;)
The silver coloured block you can see in the centre of the picture had one for the rear brake mounted on top of it with a bracket clamping on top of that. You can just make out the plastic spacer & P-clip holding the new hose.

View attachment 88737

The new HEL under-slung caliper is also fitted, bled up & I've no fault codes so assuming the ABS sensors are OK !


View attachment 88738

And that's the back end done. Just got to sort the front end out now. I just taken the new front wheel & forks to an engineering company I use to get a new axle made out of titanium ! :love:

View attachment 88739
Doesn't anyone Japanway do snazzy chain adjusters? :unsure:
 
My rear carbon hugger arrived today, from Japan. I chucked it on just to see how it looked & I happy with it. I'll take it off over the weekend, give it a good coat of wax & fit it properly with some plastic washers & a spot of Loctite.
The flash on the camera makes the carbon look a bit OTT, but in real life it looks much more subtle.
DSCN5539.JPG


DSCN5541.JPG


It's around twice the length of the OEM hugger so offers far more protection to the rear shock.
I'll take another picture over the weekend with the bike outside, hopefully that will look better.
 
Just fitted the rear hugger properly after making three more black plastic washers. The kit is supplied with three white plastic washers so I used them in-between the hugger & the mounting brackets & used my new black washers under the screw heads so they didn't look as obvious. Also put a spot of Loctite 222 on the threads as I don't like to tighten up screws too tight that are clamping carbon & it will prevent the screws working loose.
DSCN5542.JPG

DSCN5547.JPG

DSCN5545.JPG

DSCN5546.JPG

The new hugger give far more protection to the rear shock & the linkages, not that I'll be intending to go out on it in the rain, but it'll stop stones too in the dry !
Just the front end to sort out now & get a full exhaust system on it.
 
Last edited:
Loctite 222, that's bloody auto-correct or whatever it is !!

Makes you wonder how the English language is going to change in the coming years because of auto-correct & computers, God knows what's it'll be like when AI starts auto-correcting !! :ROFLMAO:
 
Back
Top Bottom