Eelco's Darmah

Cracking pictures, Cleggy!
But with Tony it's all about talk, not power (or so I've heard, I've never spoken with the man)
He's good. The work he does is top quality; If you can get a schedule, then it is all sweet. He recently re-did an exhaust thread for me which he'd done previously twenty years ago - there and back in 10 days and very reasonable.
When I opened up the inlets..
All sounds good to me.
I wrote an email yesterday to the Czech ignition wizards to make a plan in case my ignition is kapput when I get that far. There are many different ignitions to choose from ( including the successor to the RITA) but I haven't had very good experiences with fully programmable software so I may go for the simplest or even try to fix the Bosch (assuming it's bust - one of the boxes of bits I got with the bike had a used Bosch ignitor 'box' in it so I have my fingers crossed.
I like the power delivery on standard engines, hence the B&G will remain Bosch however for 'Old Green' I must admit I have got stuck on Silent Hektic. If you are not a German speaker Google Translate does an adequate job.

pick-ups - note missing screw and 'special needs' connector
See here for connectors...
This is the hole I drilled into the plug to allow some oil to reach the crank. Thanks to the article elsewhere in DUN I checked that my oil-hole was being (almost totally) blocked by the plug. Phew, narrow escape.
Andrew alerted me to this problem too - I haven't checked yet but thanks! There are a number of workarounds including drilling the plug and elongating the feed hole to miss the plug; Experimental ATM as I haven't yet given it a dry run.
 
Last edited:
I dug out the spanner I ground down to fit the head bolts and put the whole motor together to encourage me to carry on.
motorrebuiltish_zpsaf7b750c.jpg
I had a half-hearted attempt at checking the valve clearances and contemplated leaving the heads alone since the chambers hold thin oil so must seal quite well. Then I read about how to check and set the clearances and decided not to spoil the ship for a happorth 'o tar so off the heads came. I asked Mark, a neighbour, to lift the motor down off my bench onto an old workmate so that I didn't have to stand on a buffet to reach the top cylinder. i tried to lift it myself and got it off the ground but have an injured arm that won't stand another pull so admitted defeat.
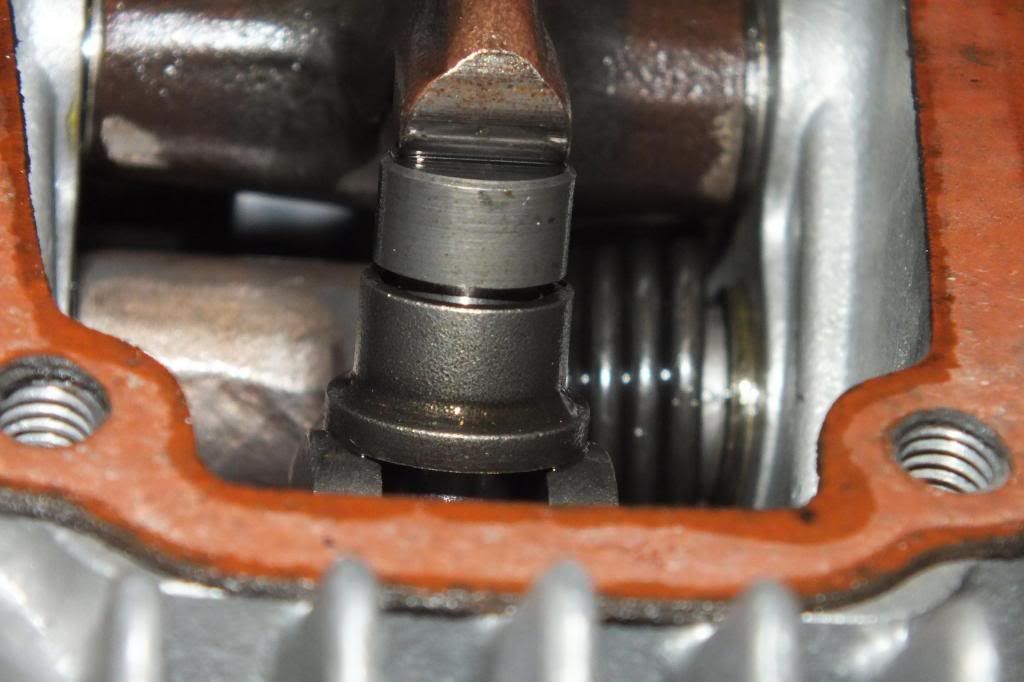
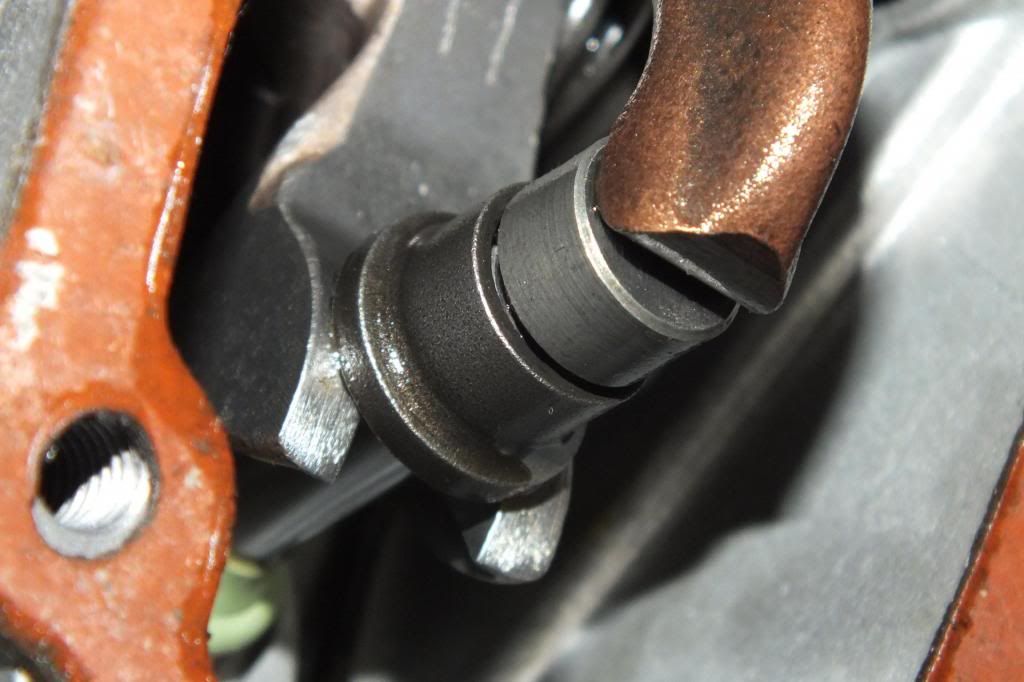
Starting on the rear cylinder first, I spotted that the valve opener wasn't central on the valve head but swapping a few shims around'll cure that (unless the off-centre load rotates the follower and spreads wear) I dropped the valves and gave them a tickle with paste and my old valve-grinding device from Mini days 'till I got a nice grey seat. The valve-stem oil seals were cracked and perished which I think might be due to a bad material choice originally. The new (black) seals look far too small to fit over the guides so I'll have to make an imaginative stretcher or look for something different, like the brown ones from Andy. Then I saw that the closing followers have little shims under them on which the fork bears. I have a feeling that this is wrong and cruising for an over-loaded shim bruising. Maybe that is the old-school way of doing it or just an alternative to buying the right size of closer from the very extensive range at Mdina Italia...
Time ran out and I'm going away again for a couple of days so the next stage of the rebuild will have to wait.
 
Last edited:
Close up pickies of opening & closing shims in place...

I have only ever seen just opening and closing shims, no 'extra's. Sounds like someone didn't want to buy new shims and I don't blame them at £15 a shot (ish) mind you, it's cheaper than an engine rebuild if it's wrong :comp2:.
DSCF7050.jpg

and another...
DSCF7051.jpg

and an overview...
DSCF7052.jpg

I hope the pickies help with what is 'normal'.

This head has done about 50 miles since a full rebuild with all new bearings (and yes, new self aligners too), new valves & guides just to be sure and all set up by Pietro.

It was the last thing I did before I discovered 'there was a lot more to do'.
 
Last edited:
Well thank you again for that and I hope that Pietro does an equally great job on your current build-up. I see with some satisfaction that the closing 'rockers' align with the valve stems and so will re-shim mine to do the same. it looks like I should have MMT join me in a measuring session so we can see how many new shims I need to find desmo Nirvana rather than Valhalla,( ie a fiery exit to a warriors resting place) as i think that was Eelco's lock-up.
With a little luck I'll be back in time today (but not to 1978) to collect my 2 into one from the powder-coaters as that looks much more in keeping than the shiny new stainless set that were on the bike.


Got my rusty old two into one back from the local barbecue powder coaters. i wanted to fit it rather than the shiney Keihan system as it's nearer the spirit of the Montjuic bikes.
I spent a fascinating half-hour with the ever-helpful MdAndy (who was evidently McAndy last week) as he showed me his special bit to help with measuring shims. I had severe tool envy again.
I bought a couple of inlet gaskets which Andy described as 'service parts' since they don't last very long and deteriorate in use. Another Ethanol casualty, perhaps. He had never seen 'shims under shims' which he kindly decided was because a few years ago parts weren't as easy to get hold of. As he looked at my measurements we realised that my valves have recessed too far into thehead, maybe when the big valves were fitted, so, to paraphrase motown, there 'aint' no closer small enough' Looks like I'll have to shorten the valve stem, making sure that the opening and closing shims don't touch.
I looked at the internet on my return and saw an American You-tube clip on valve shimming that showed a good way to measure closers by noting changes in opening clearance when the closer was pushed against the cam. That's me back in the shed, then.


More evidence of past catastrophes in the front head, where the combustion chamber and the head of the cleaned-up exhaust valve show signs of something, maybe a piece of ring, rattling around inside at some point. I'll clean it up to take the sharp edges off without lowering the compression too much. I set-to and set up one valve last night using all the openers and closers as reference and it only took me 3 hours! I'll find out soon just which new shims I need.
 
Second valve done and front head complete in about an hour and a bit. I bolted it back on and started on the top head. I'm getting better at this, but aware that pride comes before a fall...
 
it's been a while, but after a week's delay lost at DHL, my closing shims have finally arrived at Mdina and I'll have them in a day or so. The bad news is that I leave tonight for a few days working away and then in a couple of weeks am away again for a further 31/2 weeks so the rate of progress has slowed dramatically. Never mind, at least it's hot where I'm going. Whilst I was waiting I missed an auction for a sidestand that strangely, fitted on the right hand side. Maybe they do that in LHD markets? See you soon, Martin
 

Shims arrived, head rebuilt, engine back in frame, two-into-one won't fit! Either there is a special knack or it is off a different model. Whatever it will have to wait until I return. I'm going to haunt ebay for a sidestand though, or find a rubber stop to prevent the mainstand whacking my shiney 2 into 2.
 
Aaah, so that's what they are. What you can't see is that I fitted the front inlet manifold backwards! That's what becomes of being the constantly interrupted neighbourhood bicycle bodger for next-door's kids. Their feckless dad buys chep bikes from the second-hand shop and I fall soft when he sends the kids around to ask for help. In a curiously circular twist of fate however, one of their better bikes (little alloy-framed MTB with 5 gears- that worked) was stolen by the pikeys when they left it outside. I don't expect to see it again soon.
 

A bit of juggling got the pipes on but one header ring screwed in a lot further than the other until I moved the pipes around to slide the cone on. That seemed to loosen the top pipe and allowed the ring to push it further in. If it leaks when I finally fire up I'll have to do some judicial 'rejigging' with a ratchet strap or bottle jack. I had a good look at the centre-stand on which the stop seems broken-off so some work there will stop it clanging up into the pipe.
 
Cross threading...

[qimg]http://i1232.photobucket.com/albums/ff369/cleckheaton/2intoone_zps403c1734.jpg[/qimg]
A bit of juggling got the pipes on but one header ring screwed in a lot further than the other until I moved the pipes around to slide the cone on. That seemed to loosen the top pipe and allowed the ring to push it further in. If it leaks when I finally fire up I'll have to do some judicial 'rejigging' with a ratchet strap or bottle jack. I had a good look at the centre-stand on which the stop seems broken-off so some work there will stop it clanging up into the pipe.

I am sure you know this but it is exceedingly easy to cross thread the exhaust threads. Both of my heads have brand new Tony Brancato inserts from past misuse.

It is worth a jiggle or two to avoid a world of pain.
 
I was really careful after looking at the threads as I rebuilt the heads. I slapped a load of copaslip around and did the old 'turn backwards until you feel the click' safecracker trick. Both screwed in easily, one just went in much further than the other. I think that one pipe flange edge was 'hung-up' on the thread and wobbling the pipes about as I twisted the silencer on allowed it to 'jump' back further down the hole and seat properly. I was only using my hand to tighten them (With a cloth wrapped around the ring) so I don't think that they crossed. I was nervous, though...
 
I was really careful after looking at the threads as I rebuilt the heads. I slapped a load of copaslip around and did the old 'turn backwards until you feel the click' safecracker trick.

I was always warned that coppaslip on alloy is a bad thing it creates a chemical reaction there is an aluslip by the manufacturers of coppaslip.
 
Does this exhaust fitting mean a start up is viable in the near flung future?
If so, we want video of the event(with sound given that exhaust looks very similar to my old pantah's which was flippen' loud)
 
Sorry but I doubt it - I am working away for the next month and then will get started on the electrics which are very much of the rats nest variety. It sucks and blows bigstyle on the kicker though!
Don't worry, when it eventually goes I'll be recording it.
 
Took a break from cleaning the house before I go away to install the battery - well I would have done if I could get it in. Why didn't I do it before I put the motor in? Doh. Now I have to take the back wheel out or at least drop it down a lot. That is one big MF of a battery. I got it from the Battery man at Rufforth and it was the right one for a Darmah but I think that it could start a tractor! Think I'll wait 'till I come back and then really have a go. (even though I promised to start the long-delayed bathroom and kitchen....
 
I thought that was some kind of Hebrew prayer. turns out its a battery. I still mean to get over to the 'Gate and see your shop sometime!
 
Finally returned from working away and opened a parcel from Gutsibits who are good for Brembo stuff. I needed a new rear reservoir seal. I still think that someone has used 'wrong' fluid previously:

The Main stand was a bit floppy and the bolts looked very worn so I made up some 'rings' to take up the gap and also drilled and tapped the stand to take an adjustable stop. The tang that you stand on to lift the bike has been welded at some point, maybe after the accident in 1990.

Removing the mudguard and dropping the rear wheel enabled me to slide the battery in and then I started to test the electrical system. Both resistances are ok. The lead to the starter was cut and an old spark plug cap used as a temporary connector. I lugged it back in and hot-wired the solenoid just to see. The starter spins but doesn't engage. I am thinking sprag bearing? Maybe I should just take off the starter as the kicker works. Things may slow down even more as I have just had the offer of some work in August and September which is unheard of! I have started on the long list of house jobs that I have been putting off so that might cut into Darmah time even more.
 
I might be over your way on Sunday pm. Do you want me to drop your stud puller off? PM me details of address and phone number and if you're in I'll get to you.
 

I was trying to see how hard it would be to fit the tank seat unit so put it all loosely together. Sometimes you have to do this to keep you going.
 
It was originally track-bodywork on an MHR I was told. It drops straight on to the Darmah frame which is a pleasant surprise. I need to fit some rubber mounts to the frame, a more substantial 'hook' to slide under the cross brace at the back and a big band at the front. I don't like the holes that were wher indicators and stuff was mounted, but think I'll leave it as is.
 
Back
Top Bottom