Eelco's Darmah

Noooo, try and get rid of the holes. Somehow. Rubber bungs, machined bolt head covers. Filler and a number board? Numbers? Pictures of your favourite naked ladies?

 
oow i like the look of that. any idea what you're going to do ref a front mudguard as i'm looking to replace the big standard one on mine with something more 'racey' :lol2:
 
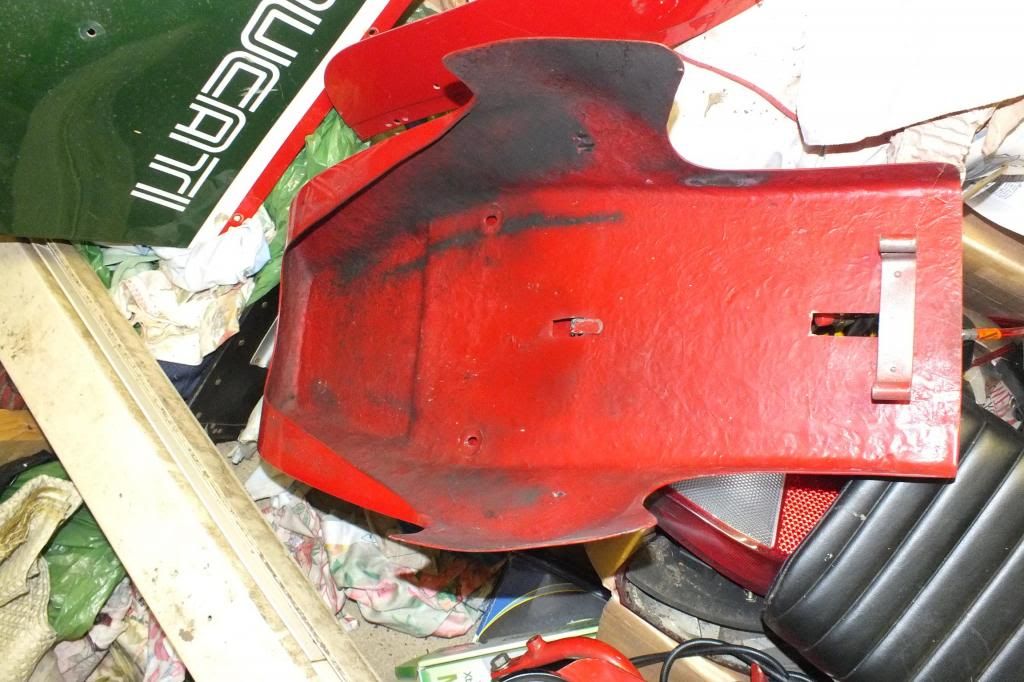
... I was trying to see how hard it would be to fit the tank seat unit so put it all loosely together. Sometimes you have to do this to keep you going.
IKWYM!

Looks nice, I like the quality look of the finish; Added benefit is you might have got yourself a much larger tank there.

The f/glass might need protecting, I have an Imola tank for one of my projects and I and bought some Caswell from Hitchcocks. Apparently it is wise to clean out the tank with acetone and then clean out with soapy water. I found this advice.

Might be up your way soon running in... (me hopes).
 
I had a visit from Rockjock 620 today which was fun. it was good to actually meet someone from the forum. Please call in if you are in my neck of the woods but bring milk, we are a non-dairy household.
So far as a front mudguard goes I am looking for something that better fits the curve of an 18" wheel. I think that the Italians just used up stocks of 19" 860 mudguards when they introduced the Darmah. That and the square profile is why they look so 'clumsy'. I'd like to fit an MHR-style fibreglass guard or maybe a steel one with a bead down the centre, the jury is still out.
The tank will need treating before I put any gas in it, you are correct. I don't actually think that it is any larger than the standard one but it looks ace, despite the holes.
 
Yes, I'd seen that site before just after the fire when everything was not in stock. There is someone in Liversedge selling fibreglass mudguards on ebay and that is very close so I might see if I can 'try before I buy' I like the fact that ragged edge do a specific 18" version, though
 
I spoke with Jeep, the chemist at Caswells who told me how to clean the tank with soapy hot water before applying the coating. They are out of stock at the moment so I've ordered it up and will get on with something else in the interim. That will probably be the steering damper which puked out all its fluid when I moved the bike last. It doesn't look rebuildable so a visit to ebay is in order, I think.
 
Looking at the seat unit on the bike, one or the other is a bit twisted. Using some string and chalk it turns out that it's the seat unit - phew. I bought a fibreglass kit and started to work on a revised mounting system. The original was fitted with a 'hook' made from galvanised mesh and body filler that slid under the frame rail. Not bad materials to attach to fibreglass but not good in this application. Folding the mesh into a corrugated shape would have been stronger but I think I can do better with some steel. We'll see if my rare egotism comes before a fall. I've ordered up some Kawasaki style rubber tank mounts and once it's sitting correctly in a non-rubbing fashion I'll finalise the new 'hook' and get a big rubber band for the front mount. Hopefully the sealer will be here by then.
 
Reps have a pillar tapped with 8mm thread welded to the frame. You can see them here...

MHRSeatMountPillars.jpg


and here too...
MH_3.jpg


The seat is drilled and I sat mine on a rubber penny washer sandwiched between two steel penny washers to spread the load, a bit like the above. Ducati just list the rubber washer as 082385035 RUBBER WASHER M8X20,0X2,0. You can see how it is done on BackToClassics site.
 
It's useful to see where they place the rubbers as well. My seat unit has no facility to screw to anything, being , I think, originally a race piece. I looked at the two bolts that hold the back end of the mudguard onto the strap steel bracket on the frame. By using longer bolts and a couple of spacers between the strap and the splash-guard I have created a slot. I am fabricating a steel 'tongue' that will slide into that slot and sit over the two bolt spacers which I'll then glass into the unit. A big O-ring used as a rubber band at the front of the unit (There are two 'posts' to hook it over) should stop it moving backwards. I'll post pictures (when I've made it work)
I also called at the local fibreglass guy this morning and picked up a Kawasaki front guard that is the correct width for the forks and looks a little more sporty than the original. He also had a conventional 'sports' style guard but that would have needed to be spread apart too much to fit. His nicely ribbed bobber guard was the same diameter as the original so would have looked similarly 'wrong', albeit in a more stylish way!
 
That's a useful site. My tank/seat unit has no mounting facility at all except the two posts at the front for a big rubber band. I've made a gap between the strap on the frame that joins the mudguard to the splash-guard and the splash guard using longer bolts and spacers with big penny washers to spread the load. I am making a 'tongue' that will slid into that gap and which I can then glass into the seat unit. The angle means that I can drop the unit in laying flat but on a 45 degree trajectory so it will be easier to pull up and back to remove it. I'll post some pictures if it works but if it doesn't, things might go quiet for a bit!
 
I don't think I am helping because I think you have gone in a different direction, however I can tie up how the seat unit on an MHR attaches to the pillars.

This is a NOS seat unit I bought (FX: sucks teeth) Ooooh, 30 years ago; It hasn't even been drilled yet. You can see where the pillars/turrets support the seat unit:-
DSCF7729.jpg


And from underneath...
DSCF7730.jpg


Pattern seat units are a bit simpler, here's one from the top...
DSCF7745.jpg


And from underneath...
DSCF7743.jpg


It is going to look crackin' however you mount it, looking forward to the pickies!
 
this plate slots over the bolts and will be bent up to fasten against the inside of the seat-back.
a close examination of the inside of the unit showed where it had rubbed through ina couple of places previously and been repaired. I'll glass these over and hope that the caswell sealant takes-care of anything I can't see.
 
That isn't the fix, that's the old, glassed-over hole! I think that it may have been done at the track using something to hand.
 
Thanks, but I'm using 'Kawasaki' frame rubbers to space it out from the steel now. If that fails my girl friends at work swear by anti-chafing cream...


I decided to fill in the hole left by the previous light unit (Which I think may have been Honda) on the tail and make it look a little like the Joan Segura Montjuic bike

I think that those lights might be Fiat (or Seat more likely- I love the style of what are probably glass lenses) and wondered about using old car style to get the chrome rings but instead decided to go for something more reliable in such a shake and splash environment, so got a couple of LED stop tails.

My unit is much shallower so I'm going to fit the number plate to the frame and use those illuminated bolts to stay legal
 
Most cool bike, lights remind me of modern Aprilia units too; Might be a cheap & easy way to achieve a similar effect. The SR50 had lights like these, here is one example and another. Likewise, the early RSV1000's had great lights, like these.

They also look quite like some tail lights used by Hillman & Austin, such as the Lucas L692 tail light unit, one on eBay here. The Cobra club seem to have got there knickers in a twist over them here.
 

Well these are what I came up with in the end, painting the repaired section satin black to hide the bumps.
The mudguard I fitted in the end was a Zephyr one
which does fit better than it looks! You have to take the forks out to fit it as it is too wide to flex into place but that will mean it is under less strain when fitted.
I'll have a look at the other lights you spotted, vacant. thanks


muddie painted and mounted. The sticker covers a finger mark where I touched it before it was dry. When I rebuild it I'll get it painted properly. BTW I know that the speedo drive comes the wrong way up but that is on purpose.
 
looks good... I do like that seat/tank unit :cool: I'm still undecided about my front mudguard, will have a measure up of the 2 Hinckley Triumphs as they look like they 'might' fit..
 
Although the 'Zephyr' guard fits exactly between the suspension sliders, that may not be such a good thing as the brake hoses go between the guard and the leg on the standard bike. maybe a 'racing' guard that is 1/2" narrower would be neater, spaced out to give room for the hoses.
The fiberglass guy said that If I gave him my tank-seat unit he'd take a mould off and make some more. I don't really want to destroy the patina on mine, though. They are available already and I can see that the cost, taking into account sealing against ethanolol and a filler-cap, tap bosses etc might not be too competitive, not to mention product liability of petrol tanks etc. If you really want one, let me know and I'll do some investigating.
 
I have decided to rewire the bike with a minimal harness but was in two minds about the starter. When I hot-wire the starter it spins but the rotation of the ring-gear isn't transmitted by the sprag bearing to the flywheel. I took off the side-case and cannot see a problem with the bearing. On reassembly it does seem to 'grab' a little more on turning so I am thinking that the assembly lube might have 'stuck' the 'woggle' fingers in the bearing in an 'out' position. I'm going to try it all again but if it doesn't work I'm going to do away with the starter and rely on the kicker. That way I can also opt for a battery that is smaller than a house .I'll also be doing away with the indicators.

As I look at the wiring diagram I have a memory that the generator light does something unnatural on these bikes, to do with the 'Motoplat thing'? If I do rewire it, I should like to have a normally functioning charging light, ie one that only illuminates when it isn't charging. Is that even remotely a good idea and if so, how do you go about achieving it?
 
Back
Top Bottom